Product Spotlight – Flashing and Fixing Clips

Flashing and fixing clips are an efficient way of fixing lead sheet into a masonry joint that can save time and give a uniform finish. Originally designed by a roofing contractor, Jimmy Hall, they were designed specifically to be used during the installation of lead flashings.
It was whilst on a roof that Jimmy came up with the idea out of necessity. Jimmy said: “Frustrated with the time-consuming process of rolling pieces of scrap lead and hammering them into wedges, I thought there must be a better way.”*
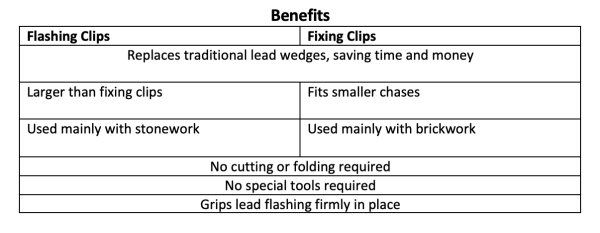
Roofers who want to achieve a great finish, use flashing and fixing clips as they ensure a perfect fit and firmly grip lead in place. Ashley Kennie, Contracts Manager at NRA Roofing and Flooring Ltd uses flashing and fixing clips as best practice when installing lead flashing, he said: “We always use clips for many reasons including the fact that they cause less damage when installing, as more traditional methods can push against the brick or stonework. Fixing and flashing clips also undoubtedly save so much time and they are very simple to use.”
When used correctly they can be installed within seconds and they are specially made for the job in hand taking away the need to cut, roll and shape lead. Fixing clips also allow the flashing to be dressed before pointing to give a professional finish.
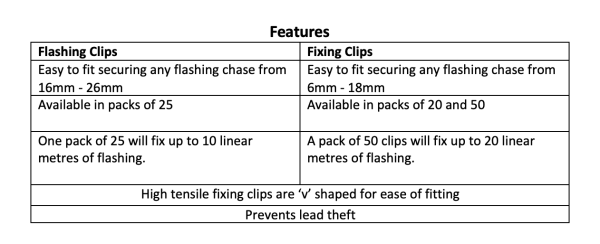
Chases are often wider when working on stonework making the flashing clips ideal as they firmly secure lead flashing up to 26mm, on the other hand the standard fixing clips are the best way to achieve that neat, stepped finish on brickwork.
It is recommended that a minimum of one clip per step or per ½ linear metre is used, but this may vary depending on particular jobs. Here at Midland Lead we supply both flashing and fixing clips, so we have taken the opportunity to describe the features and benefits of both.
Within seconds lead flashing can be fixed in place, without any extra effort and this short video demonstrates how quick and simple they are to use to achieve the best result.
How to fix lead flashing with flashing and fixing clips
- Remove the mortar to a depth of 25mm to form the chase
- Ensure the joint is dry and dust free
- Insert lead roll to the back of chase and dress it flat against the wall
- Insert fixing clip (H side to the top) to back of chase. Lightly hammer in using a flat bladed screwdriver, bolster chisel or similar
- Point or seal the joint as desired
Midland Lead fixing clips are supplied in a box of 20 bags of 20 clips (400) and a box of 10 bags of 50 clips (500). Flashing clips are supplied in bags of 25.
We also recommend that lead sealant is used alongside flashing clips, as this is used to point the flashing and give it a professional finish after the clips have been installed. Lead sealant is available in 310ml tubes.
Patination oil is also a product that should be used to protect the lead while it develops its natural patina and prevents unsightly staining of tiles and brickwork that can occur if lead work has been left untreated.
For more information about these and our other ancillary products visit https://www.midlandlead.co.uk/products/ancillary/ or give our sales office a call: +44 (0)1283 224555
*source: www.geniusroofsolutions.com